

File Functions > The File Print Command > Dialog Features
|
|
Dialog Features

Print Quality List Box
The Print Quality List Box allows you to select from among the various print qualities available for your selected printer.
Copies Edit Control
If your printer driver supports multiple copies, this edit control allows you to specify the number to print. Printing multiple copies is much faster than repeatedly printing single copies because the computer does not need to repeat its calculations for each copy.
Print To File Check Box
Selecting this check box will redirect the printed output to a file. This file can be sent to the printer later. You will be asked to enter a file name when you start the print job.
Collate Copies Check Box
If you are printing multiple copies, selecting this check box will cause each copy to be collated. That is each copy will be printed in its entirety in proper page order before the next copy is printed. Otherwise, the requested number of copies of each page will be printed together.
Order Button
By default, the images are printed in the order they are opened or created. Pressing the Order button lets you override this default order and specify the order in which the images are to appear on the printed page. When you press the button, the Print Order Selection window comes up. It contains a thumbnail which represents each open image. You can change the print order using two different techniques:
1. In the first technique, you can drag each thumbnail into the desired position using the mouse.2. In the second technique, you press the Order button and then click on each thumbnail in the order in which you would like it printed. After you have clicked on every thumbnail, or after you press the Done button, the thumbnails will be rearranged into the selected order.
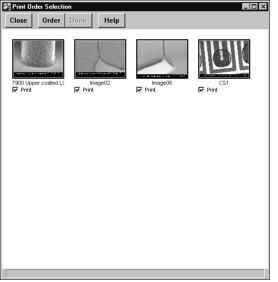
By deselecting the checkbox underneath its thumbnail, you can indicate that a particular image is not to be printed.
Where multiple images are printed on a single page, they are placed in order by row. For example, where four images are printed per page, the first two images will occupy the first row on the page.
OK, Cancel and Setup Push Buttons
Pressing OK will start the print job.
Pressing Cancel will abort the printing procedure
Pressing Setup will bring up the Print Setup Dialog which is discussed in The File Print Setup Command.Per Page Drop-Down
When you are printing multiple images, the Per Page drop-down is used to select how many to print per page.
Include Check Boxes
The file name, description, notes, signatures and/or audit information will be printed with the images if the appropriate check boxes are selected. Press the Font button to select the font to be used in your print-out.
Scaling Options Buttons
The Scaling Options buttons determine how the images will be scaled when they are printed.
If you select Fit To Page, the images will be scaled to make the best use of the page area. Note that the best use of the page is made when the orientation of the images matches the orientation of the page. The orientation of the page is set with the Print Setup Dialog which is described in the following section.
"None" indicates that no scaling is to be applied. When the system is installed, the Acquire Setup Command is used to specify a nominal image width for each instrument (see The Acquire Set Up Command). This is the printed size at which the magnification superimposed on the image by the microscope is correct. Selecting the None scaling option will print the image at this size.
"Scale Factor" scales the image by the percentage specified in the edit control. 100% is the same as the "None" setting described in the previous paragraph.
"Specify X Size" allows you to specify the size of the X dimension of the image. The units are specified by selecting either inches or mm from the dropdown beside the Specify X Size edit control. If, for example, you want to print an image the same size as a Polaroid print, you would specify an X size of 4.5 inches.
Halftone Options Buttons
Halftoning is the technique in which gray scales in the images are translated into the pure black and pure white dots a printer can produce.
Most printers, or their Windows printer drivers, are capable of acceptably halftoning images. For these printers, select Printer Generated halftones.
For other printers, select Computer Generated halftones. The LPI edit field allows you to specify the number of lines per inch in the halftone screen that will be applied to the image. There is a trade-off between the size of the screen and the number of grays the printer can reproduce:
+1
Using the example of a 600 dpi printer, with a 120 line screen we can produce 51 distinct gray levels. This usually produces acceptable results and is a satisfactory compromise between gray scale and screen size. Experiment to find the setting that best suits your taste.
|
|