

Using PCI/CFR > The PCI/CFR Screen
|
|
The PCI/CFR Screen
When you start PCI/CFR, the PCI/CFR main window appears. PCI/CFR lets you work with many images at the same time. Each image appears in its own window and all of these document windows are contained in the main PCI/CFR window.
The menu bar is located at the top of the main window. The menu bar is used, as in all Windows applications, to select the functions you want to carry out.
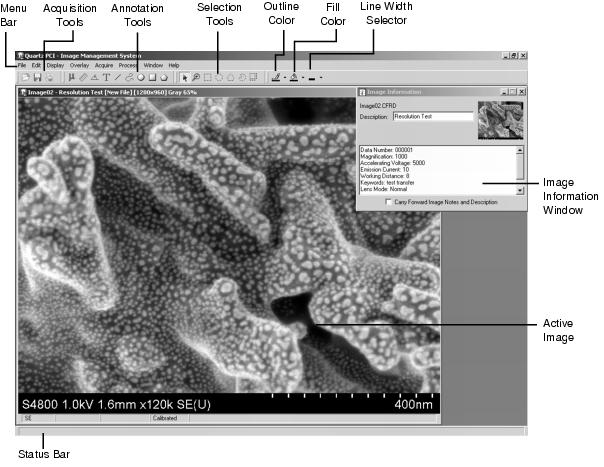
The main window also contains a tool bar which includes four groups of tools: the acquisition tools, the selection tools, the annotation tools and the color and line width selectors. Each of these sets of tools may be enabled and disabled using the appropriate Display Tools command (see The Display Tools Command). The Display Tools command can also be used to choose between displaying large or small icons on the toolbar.
The acquisition tools are used to stop and start image acquisition. The selection tools are used to select drawing elements, select image regions and zoom the image. The annotation tools are used to draw on your images.
The space allocated for each type of tool can be adjusted by moving the slider between the sections of tools. Sometimes, there is not enough room to display all of the tools in a section. In this case, you can click on the double arrow symbol which will cause the remaining tools to pop up. The functions of the individual buttons on the tool panels are described in more detail in following chapters.
The Status Bar, located at the bottom of the main window, shows a short description of each menu item as you select it and provides status information while using the drawing tools. The status bar can be turned on and off by using the Status Bar command on the Display menu.
Each document window has a caption bar which displays the file name and a description of the file followed by the version number, the image's dimensions in pixels, an indication as to whether the image is color or grayscale and the amount by which the image is presently zoomed. If the image is too big to fit in the window, then scroll bars appear on the sides of the window. These scroll bars can be used to scroll obscured parts of the data into view.
Most menu commands act on only one image. This image is called the Active Image and can be distinguished from the others because its border is highlighted and it appears on top of the other images. To select a particular image as the active image, simply click the left mouse button anywhere in its window.
Information about the active image is displayed in the Image Information Window. Features of the Image Information Window are described in The Display Image Information Command.
The number of images that can be loaded simultaneously is limited by the memory available in your computer. An error message will be generated if you attempt to load too many.
If you have the Secure Repository Option (see The Secure Repository), you will notice two tabs at the bottom left of the PCI/CFR window that allow you to switch between Data View and File Manager. Data View is the main PCI/CFR display described above. File Manager allows you to manage both image and non-image files that are stored in the secure repository. For information about the operation of the File Manager, please see Using Quartz PCI/CFR.

|
|